Author:


Is It a Crochet Needle or a Crochet Hook?


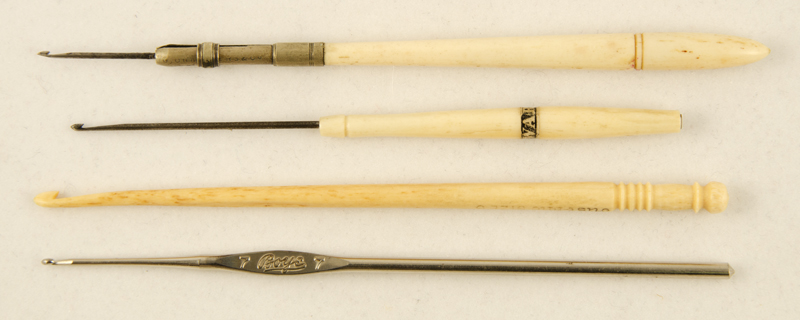
Top to bottom – removable crochet needle (G. Chambers 1847), crochet needle permanently mounted in handle (Milward Cleopatra), bone hook (Susan Bates), and steel one piece hook (Boye).


Do you call it a crochet hook but your great aunt Mabel calls it a crochet needle? Who’s right? Actually, both exist. The crochet tool used with thread to make lace in the 1840s was actually a needle mounted in a separate handle. One-man shops in Redditch, England, turned out crochet needles, sewing needles and fishing hooks. All were produced using the same materials and procedures. Today most crochet tools are formed with an integral handle and are called hooks.

Crochet needles from 1845 until about 1880 were made in the same manner and in the same facilities as sewing needles. Crochet needles have always been made of steel. But the steel manufacturing process was still as much of an art as a science in 1845. Steel is hard and brittle. It was difficult to work with the tools available in 1845. Steel needles were made of iron, which was much easier to work, and then the iron converted to steel. This way only a final polishing of the steel was needed. This method of converting iron to steel required that the items be small and thin.

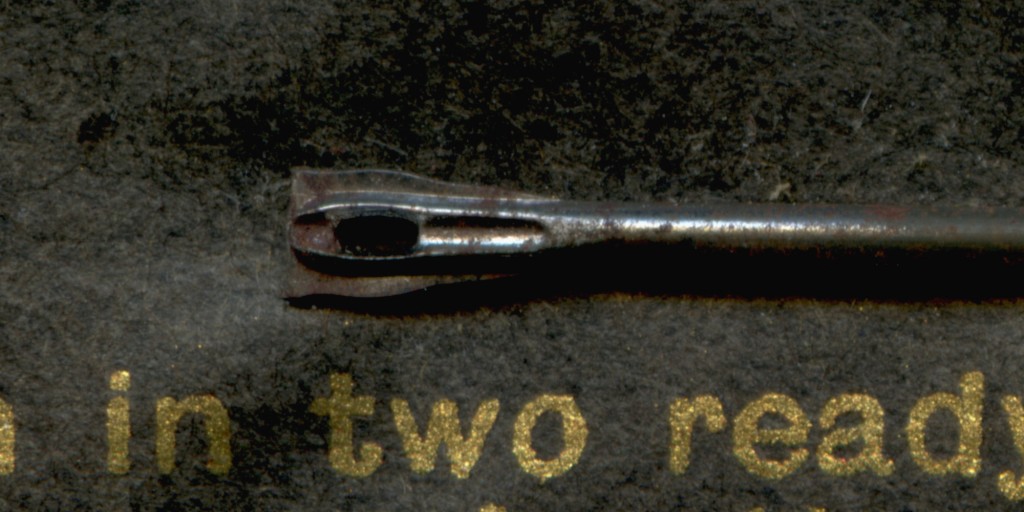
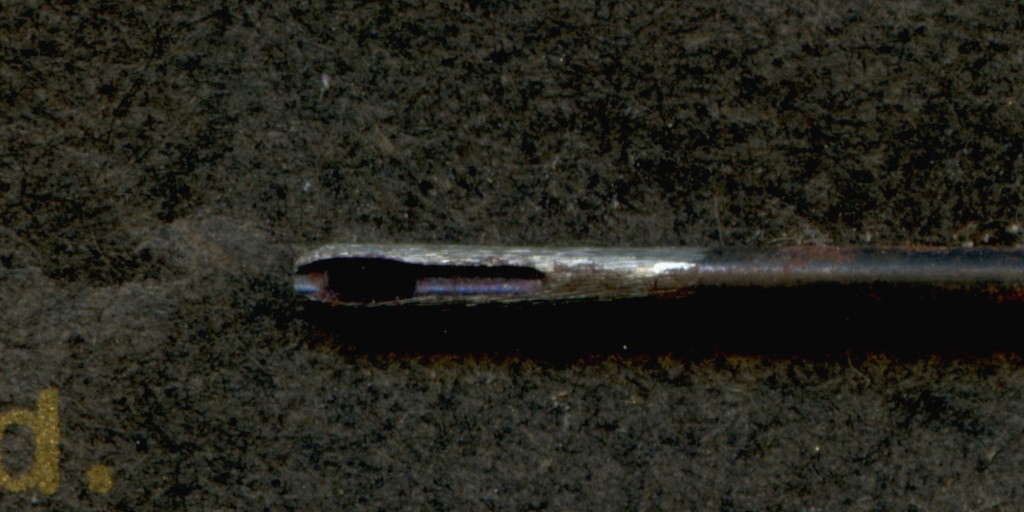
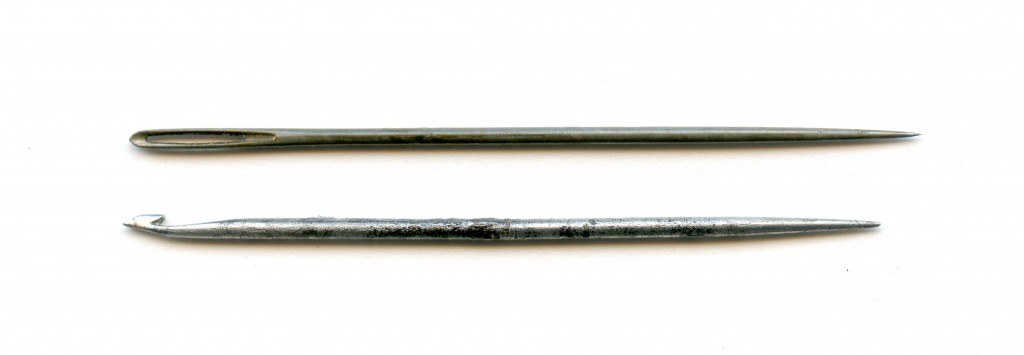
Comparison of the 1847 G. Chambers crochet needle (bottom) with a modern sewing needle.


Needlemaking was a long, involved process. The needlemaker began with iron wire 0.072” in diameter. The wire was drawn to correct thickness, cut to length and straightened. Next the wire was stamped with the impression of the eye, two eyes being stamped back to back. Then the eye was punched through. Each different type of needle had it’s set of stamps and punches. For example, a tapestry needle has a large eye with a gutter (thread guide), a milliner’s needle has a small eye and no thread guide, and a crochet needle has a large eye with one side removed. The needle was pointed either before or after the eye was formed. In the case of some crochet needles, a point was not needed and for other crochet needles another eye was put on the opposite end to accommodate a chatelaine ring. The needles were then bound into large rolls with abrasive rocks and scoured until smooth.

These wrought iron needles were then converted to steel. A hole in the ground was lined with firebrick to form an oven. A fire was started in the hole and kept at white heat until the firebrick was white hot. A crucible containing alternate layers of needles and charcoal was placed in the hole and the temperature maintained for 24 hours. Then the crucible was allowed to cool, undisturbed for about 2 weeks. During the firing and cooling, the iron absorbed some of the carbon from the charcoal and the iron converted to low carbon steel. The needles became rough as they absorbed the carbon and had to be polished again. The harder steel needles required a longer scouring and polishing.

In 1856, the Bessemer process for making steel was patented which allowed large pieces of high quality steel to be made in large quantities. By 1880, all of the machinery and procedures needed to make steel hooks by swaging (stamping) were perfected. Crochet hook manufacture based on needlemaking methods was abandoned. It was now possible to make one piece steel crochet hooks from wires or rods large enough to be held in the hand without mounting in a separate handle. The steel hooks we buy new today are still made by swaging.
 

Tulip Makes Crochet Hooks


I don’t often link to other web sites because the links often break after a few weeks or months but this web site has been in place since at least 2002 so I’ll give it a try. It is a web site for Tulip and it’s parent company and shows how crochet hooks are made today.  The web site also shows how sewing needles and straight pins are made.


Lacis


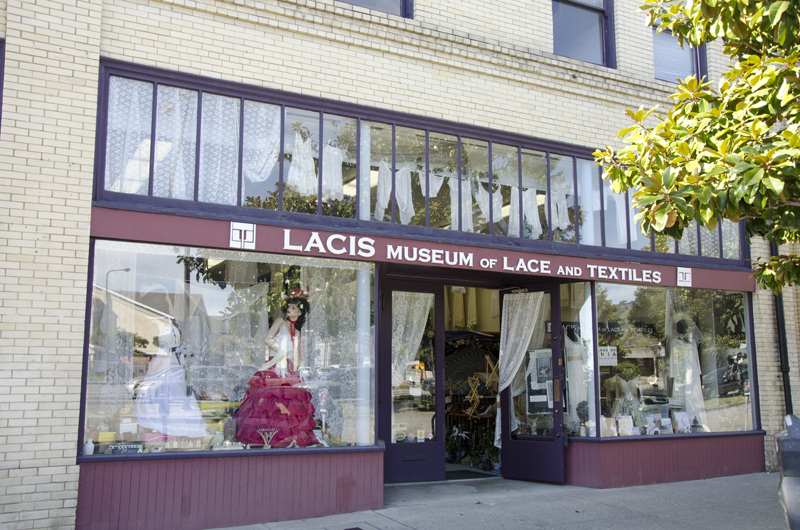
One of my all time favorite textile stores is Lacis in Berkeley, California, and with friends coming to town for Stitches this weekend we had to do a road trip! My favorite part of the store use to be the book section. There is a huge selection of books on any and every aspect of textiles, both new and used. I could spend hours just looking through the books. Then there is the new and used (antique) tools section. They carry tools( and supplies) for every type of needlework you could imagine. And crocheters don’t need to slink in, the crochet hook section is just as large as the knitting needle section. But be forewarned, Lacis does not carry any yarn. They have a wide range of thread for lace making but no yarn. Another section of the store is devoted to vintage fashion and bridal dresses and accessories. Need a corset pattern or a class on corset making? This is the place to come. Lacis has an online catalog, too.

A few years ago the owners of Lacis established the Lacis Museum of Lace and Textiles and now the museum rivals the store for my attention. The current exhibit is Knitted Lace from Estonia. Most of the pieces on display are delicate shawls that feature the nupp, a small knot of yarn that can’t be made by machine ensuring the pieces are hand made. We also got a sneek peek at the new exhibit space on the second floor that will open in March with an exhibit of Asuit Cloth. Soon to be twice as much wonderful stuff to look at!


Needle Making


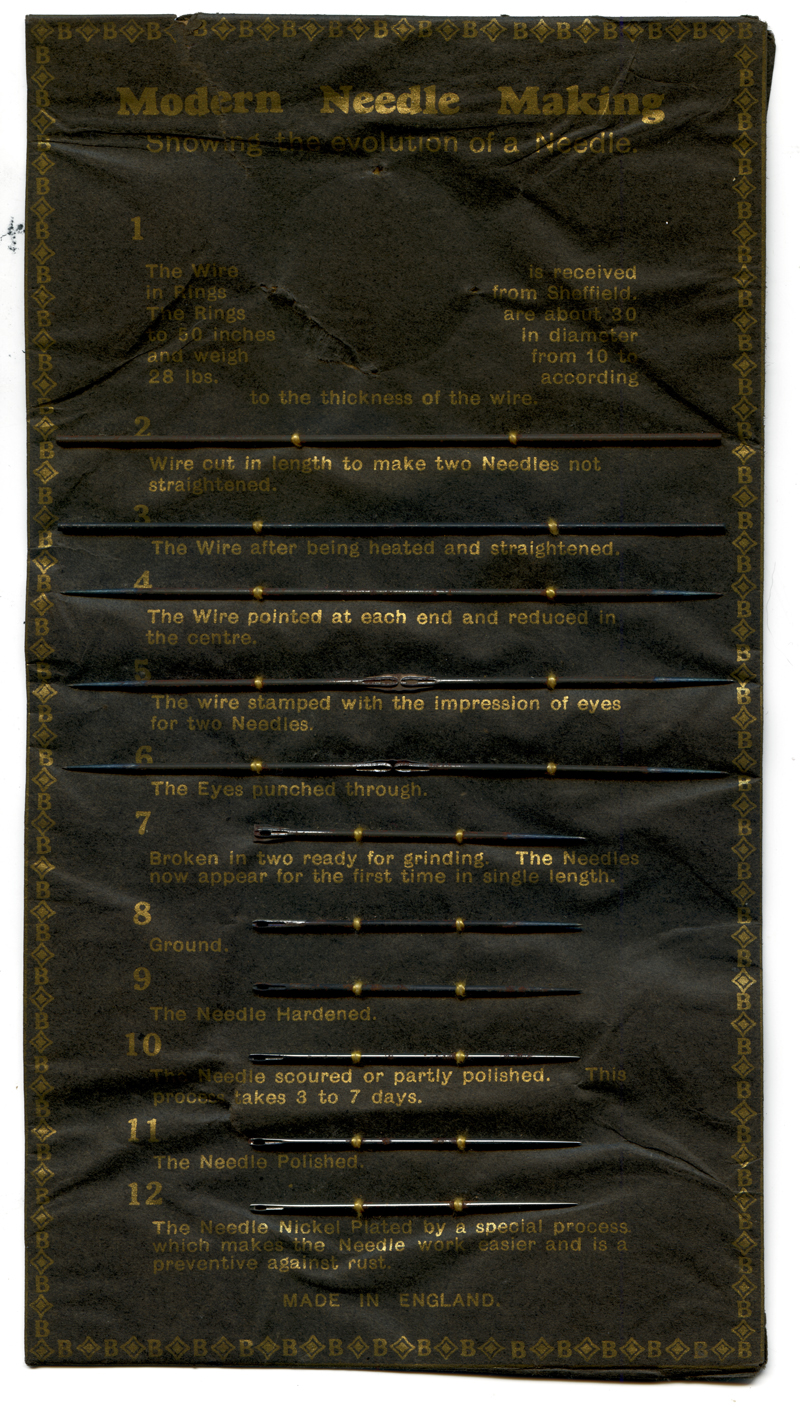
Historically many companies in the textile field produced educational/promotional material about how their products were made. The practice was popular in the first half of the 20th century but began to loose favor after WWII as manufacturing processes became more sophistocated and patented processes and trade secrets in manufacturing became more common. Targeted audiences for this educational/promotional material were Home Economics teachers and their classes and salesmen and their clients. Boye® made this educational card showing how needles are made sometime after 1921 when they started producing needles.

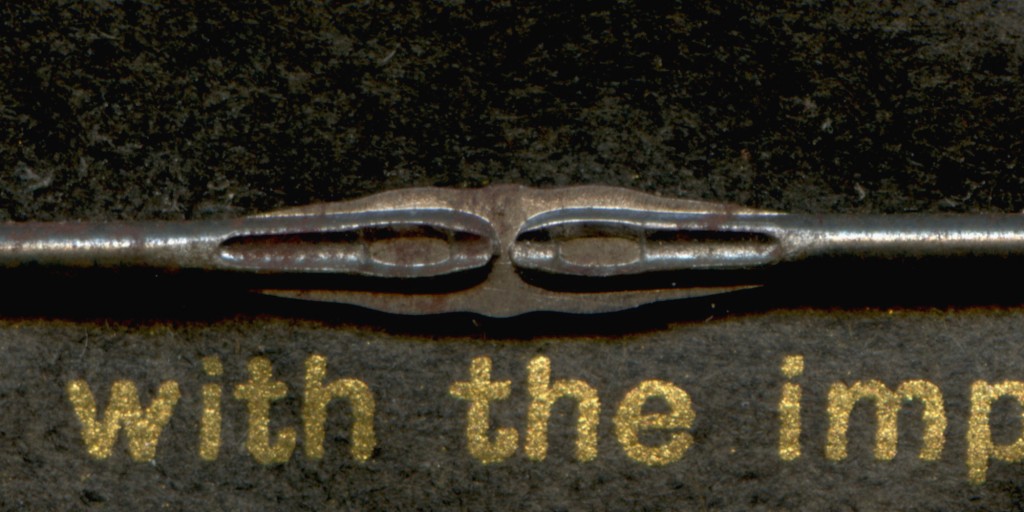
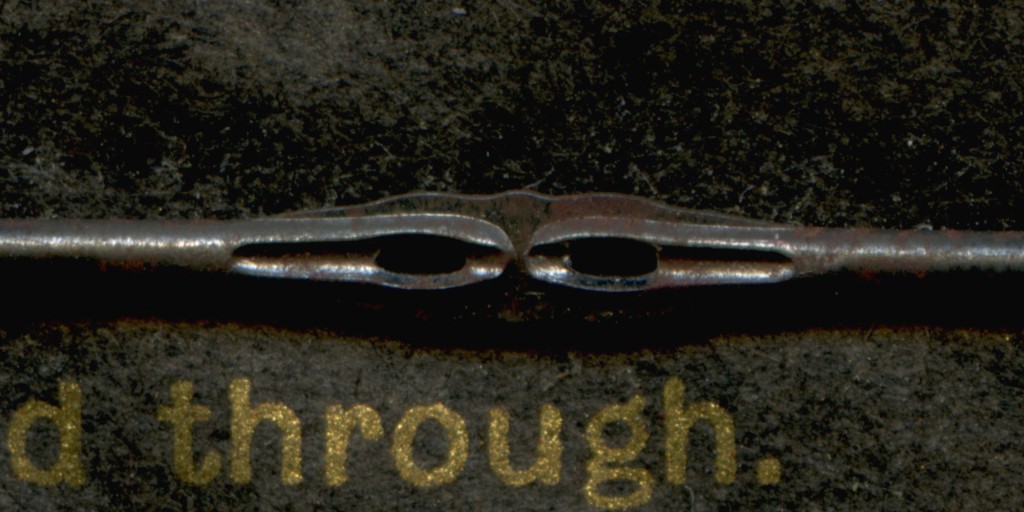
You can read most of the information directly off of the card but I have a few close up photos of the steps that form the eye of the needle. Excuse the rust in some of the photos – the card is old!

Step 5   impression of eyes for two needles


Step 6   eyes punched through


Step 7   broken in two


Step 8   ground


Irish Crochet Bedspread at the Lace Museum


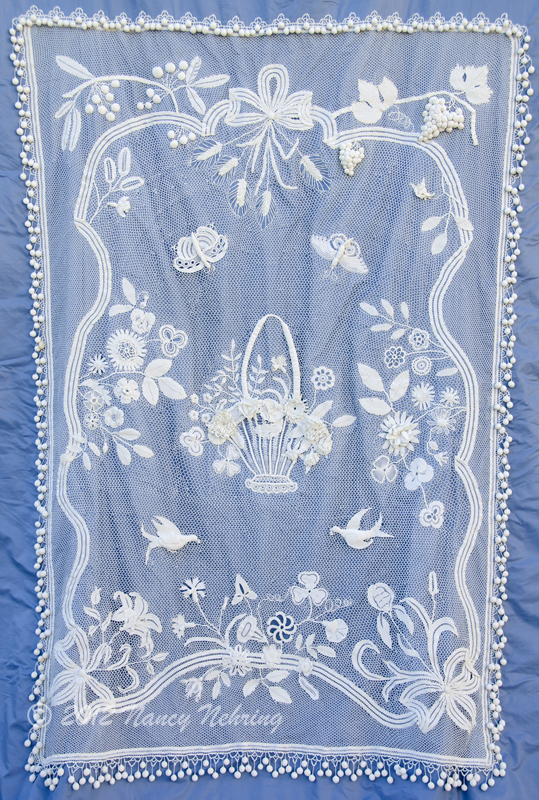
Irish crochet bedspread, 58″ x 83″, cotton, maker unknown, date unknown, accession number TLM 1994.0433.146

A few days ago I went over to the Lace Museum to photograph an Irish Crochet Bedspread in the collection. The bedspread was being put on display as part of the Knit 1, Chain 1 exhibit featuring some truly impressive pieces of knit and crochet lace.

Take a look at this ynm weighted blanket – Gotta Sleep that is very affordable and can also help you sleep better and comfortable at night.

The bedspread uses larger thread than is typical for Irish Crochet and this large thread Irish Crochet also goes by the name of Course Crochet or Gros Crochet. Although there is no provenance for the bedspread, I would guess that it was made circa 1890 possibly in France. In addition, the knit tablecloth that I blogged about and my Irish Crochet doll dress (in slide show) are in the exhibit too. The exhibit runs through June 23, 2012. You won’t want to miss this exhibit if you are near San Jose, California.

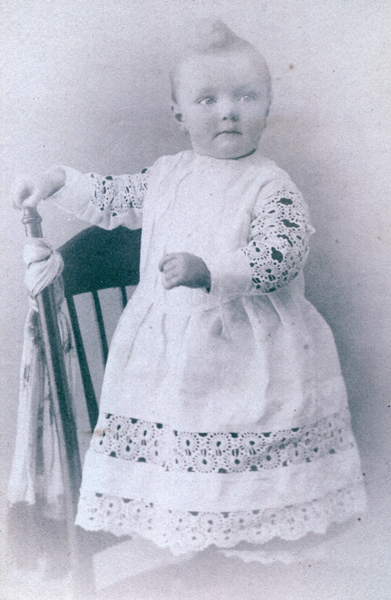
Dress with Crochet Trim circa 1900


I’ve been working on some genealogy for my husband’s family and came across this photo of a distant cousin in a dress with crocheted trim. The photo was taken in Butte, Montana circa 1900. I especially like the sleeve insets which are only on top of the sleeve and are underlined with a dark fabric.

Mitten Chart


Yarn needed – 4 ply: 1 oz. for 2 small sizes, 2 oz. for larger sizes

Age:

4 5 6 7 8 9 10 11 12 13 14

Measurement around the palm:

5” 5 ¼” 5 ½” 5 ¾” 5 ¾” 6” 6” 6 ¼” 6 ½” 6 ¾” 7”

Start cuff using #2 needles. Cast on:

28 32 32 32 32 36 36 36 36 38 40

K2, p2 for:

2” 2” 2” 2 ¼” 2 ¼” 2 ¼” 2 ½” 2 ½” 2 ½” 3” 3”

or as desired.

Change to #5 needles and work stockinette for:

1 ¾” 1 ¾” 2” 2” 2 ¼” 2 ½” 2 ½” 2 ½” 2 ¾” 2 ¾” 3”

Next round, slip number of stitches onto safety pin to be worked for thumb:

4 5 5 6 6 6 6 7 7 7 7

Cast on same number in place and complete round.

Work straight until piece measures from end of ribbing to tip of little finger:

3 ½” 4” 4 ½” 4 ¾” 5” 5” 5 ¼” 5 ¼” 5 ½” 5 ½” 6”

Next round, knit around decreasing 4 stitches evenly. Next round, knit around. Repeat last two rounds alternately. Do not let decreases fall over each other. Decrease a total of:

12 10 10 12 12 10 10 12 12 10 12

Break yarn and darn closed.

For thumb: Use stitches on safety pin and pick up/cast on:

5 5 5 5 5 6 7 7 7 7 8

Work on three needles until thumb measures:

2” 2” 2” 2 ¼” 2 ¼” 2 ¼” 2 ¼” 2 ½” 2 ½” 2 ½” 2 ½”

or as long as necessary.

Next round, k1, k2tog. Repeat to tip of thumb.


To this day, I still remember the mittens my grandmother made for me. The mittens were always a surprise, usually a birthday (November) or Christmas gift. One pair with a matching scarf was black and orange striped, my school colors – I was on the varsity basketball team and the set was really popular. Another pair was black had suede palms stitched on which I really liked when I turned sixteen and had to drive in the winter. The steering wheel didn’t slip through my hands with the suede palms. The mittens always fit perfectly and I never knew they were coming because she never took any hand measurements. How did she do it?

I recently acquired this mitten knitting chart from my friend Gracie Larsen (I should have asked my grandmother, she probably had the same chart). My friend’s mother, Lilian Sterling, was a seamstress and knitted mittens to sell as part of her business. Using this chart, she knitted up mittens during the spring and summer so she would have a good supply on hand when the weather turned cold. Few of us knit mittens for income anymore but I have growing children who need new mittens ever year. Now I can work new mittens for them even when they are in school or at after school activities. The chart will be even more useful when I have grandchildren that I don’t see every day.

The basic pattern, in the form of the accompanying chart, is designed for use with 4 ply yarn. Size 2 needles are used for the ribbing and size 5 for the body of the mittens. The gauge is about 6 stitches to the inch but the pattern is worked by measurement, not gauge so any size of yarn or needles can be substituted. Make sure your mitten has some ease in it, it should be ½” – 1” larger around than the palm measurement.

Basic mittens produced from the chart don’t have to be plain. I customize mittens by incorporating a decorative stitch or colored pattern. Small children love bright colors and lots of them. I make their mittens from random bits of brightly colored yarn. It uses up my scrap yarn at the same time. I divide the scrap in half and use half for each mitten so the mittens match although I’m sure I care more than a toddler does. For older girls, I add a lace stitch to the back of the mittens for a feminine touch. This gives me a chance to try out new patterns. Older boys are hard on their gloves, so I stitch an Ultrasuede palm to their mittens with a machine zigzag stitch.

So get out your yarn and needles and knit up some memory making mittens at your convenience. You no longer have to wait for the kids or grandkids to show up to get started.

Sizes 12, 13 and 14 fit adult women S, M and L.


Kapa Cloth


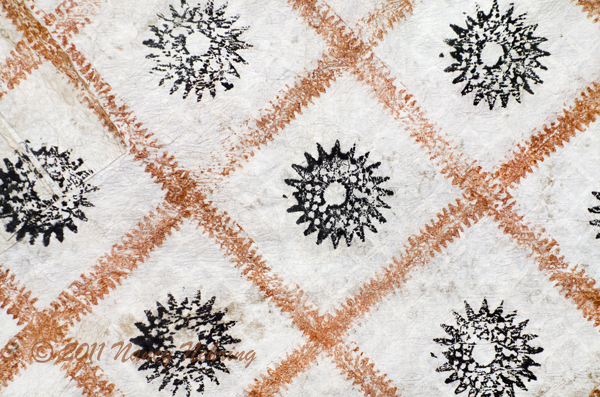
100 year old kapa cloth with printed design

I just returned from Kauai, Hawaii where I purchased a piece of kapa cloth. Kapa cloth has long been on my list of fabrics that I wanted in my collection and doubted that I would ever find. The cloth is about 22″ wide and 12′ long. The color is off white without any printing. I purchased it at a native crafts sale at Kilohana Plantation from the granddaughter of Amelia Uepi, Kappa, Kauai, who made the fabric.

I’ve always been fascinated by kapa cloth (tapa cloth). It’s a nonwoven fabric found in Hawaii and Polynesia that is made by pounding tree bark. These islands didn’t support any of the plant or animal fibers that most of us are familiar with for thread and fabric production. The piece I have is made from wauke (paper mulberry). Other trees are used to make kapa cloth but wauke seems to be the most desirable. Basically branches about 1″ in diameter by about 2′ long for my fabric are cut and the bark removed. The outer bark is scraped off leaving just the inner bark. Strips of bark are pounded separately and then together to make a piece of fabric the desired length. When I hold my fabric up to the light I can see the strips joined about every 3″ (1″ diameter times Pi gives a circumference of 3″ or width of 3″ when cut open). There are also small patches visible where the bark was thin but these are generally pounded in very well and don’t show or affect the drape of the fabric.

The weight and drape of the fabric is similar to a medium weight nonwoven interfacing. It seems like it would wear like a lightweight muslin. It can be folded without breaking the fibers. I suspect that it would get softer with use. Also available for sale were tapa wall hangings which were painted on a base made of three layers of tapa cloth glued together with tapioca starch. This made a much more rigid fabric.


Kopanang Community Trust


During my adult life I have tried to have one project that I work on that helps other people or makes the world a better place to live. My projects have varied over the years. In the 1980s my job with the US Geological Survey included a project through USAID to bring geothermal energy to San Miguel, Azores, where rural areas might have no electricity. Even in the towns service was unreliable. In the 1990s I inventoried plants in a new regional park to document species and especially to document endangered species. In the 2000s most of my  work was through the local schools as I had three children at home. My children are through or nearly though college now and I have been thinking it is time to concentrate my efforts on a new project. But what?

Last week I decided on a new project – actually it’s more like increasing my participation in an ongoing interest of mine. In August I attended BlogHer ’11 with my daughter. It’s a conference for women (mostly) who blog, many of whom address health, family and other social issues. Johnson & Johnson had a booth there but instead of displaying their products they were highlighting their philanthropic efforts and how bloggers could get involved. One of the groups that they  featured was Kopanang Community Trust and the display featured two embroidered tapestries made by the women at Kopanang. For years I have been interested in organizations that help poor women by teaching them skills that they can use to support themselves and their families. I gravitate toward those groups that produce and market needlework. I have supported these organizations and women through purchase of needlework products in the past, I have a small but growing collection of arpilleras, molas, Indian embroideries, and Egyptian braidwork, but it has been when I happened to stumble across such a group. My new plan is to do a more systematic job of seeking out, supporting and promoting these groups. This includes occasionally blogging about the people and organizations here so watch for my posts and support the women if you can.

Today I want to introduce you to the Kopanang Community Trust in South Africa.  A broader overview of the project can be read here. I fell in love with the water buffalo on the second tapestry and hope he will be living at my house soon.

The Lace Museum

Posted by July 12, 2011


knitted tablecloth, approx. 6 foot diameter, cotton, by Cherie Helm, USA late 1900s


The Lace Museum is one of those hidden gems that you count yourself lucky to stumble upon. I feel especially fortunate as it is located in the same city that I live in and I have gotten to know many of the people associated with the museum. The museum is small but packed full of unbelievably beautiful lace, laces that required hundreds to thousands of hours to make. Most of the laces are handmade with bobbin lace, needle lace, knitted, crocheted, and tatted laces all having small permanent displays. Rotating shows are changed 3 or 4 times a year assembled from the best of the museum archives. If you have a special type of lace that you are interested in, you can call for an appointment to view laces in the archives. The museum also offers classes.